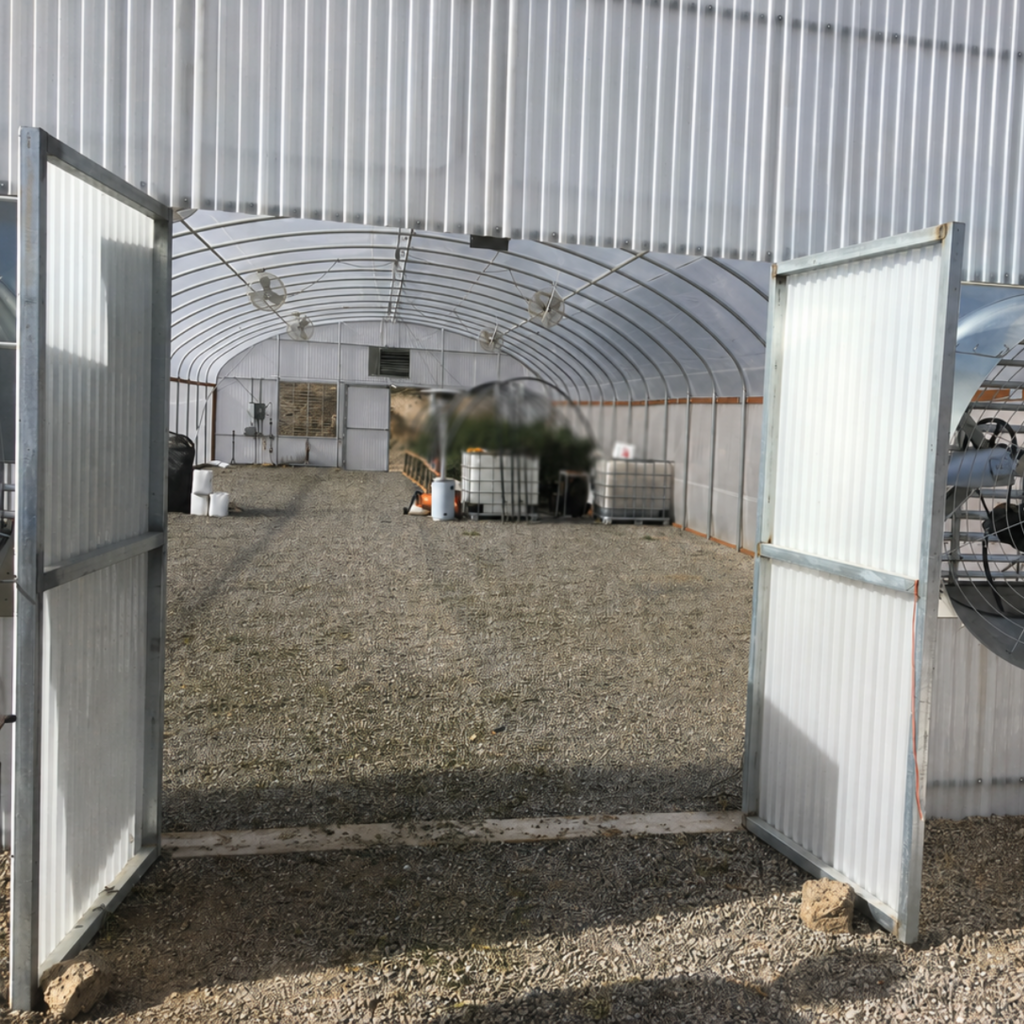
A greenhouse pad is a level, compacted, free-draining stone base built under a greenhouse so the frame stays square, the floor stays workable, and water leaves instead of sitting. The work strips the soft organic soil off the footprint, proves the ground underneath is firm, rebuilds the area in compacted structural stone, and finishes it flat enough that a frame bolts together without fighting the ground. It is the same work we do every week through our gravel installation and driveways service across Central Massachusetts.
Most people shop the structure and treat the ground as a formality. It is the other way around. A greenhouse is a light building carrying a lot of glass or film, and light buildings have no weight to hide a bad base. The greenhouse pad is what decides whether the frame ever squares up, whether the door still latches in February, and whether the inside is a working floor or a mud tray by the end of March.
This guide covers what a greenhouse pad actually is, how the stone base gets built, how to size it to the frame, how drainage and level are handled, how a light structure gets anchored to gravel, and the frost, permit, wetland, and zoning rules Massachusetts adds on top. The job is one specific corner of gravel installation, done at a scale where every shortcut shows up in the first season.
What Is a Greenhouse Pad, Exactly?
A greenhouse pad is an engineered stone base sized and shaped for a specific growing structure. The finished pad is a rectangle of compacted crushed stone over firm subgrade, cut level across its surface, contained at the edges, and set slightly higher than the ground around it so surface water runs off rather than in.
Two words in that description do the heavy lifting: compacted and contained. Stone that has not been compacted in layers is a sponge that settles under the frame rails. Stone with no edge containment migrates outward every time a wheelbarrow crosses it, and the pad slowly spreads and thins until the frame is sitting on soil again.
A greenhouse pad is also not the same thing as a level surface. Raking stone flat over sod produces a level surface for exactly one winter. A greenhouse pad produces a stable one, because the load path runs from the frame down through compacted stone into ground that was proven firm before anything was stacked on it.
Hoop houses, high tunnels, glass houses, kit greenhouses, and lean-to structures against an existing wall all sit on the same principle. The size and the depth change with the structure and the soil. The sequence does not.
Why a Greenhouse Needs More Than a Shed Pad
A greenhouse pad and a shed pad installation start from the same recipe, then part company on three points. The first is tolerance. A shed is a rigid box that shrugs off a base that is a little out. A greenhouse frame is a thin assembly of aluminum or steel members squared by glazing, and a base that is out of level racks the frame until panels bind, crack, or pop out of their clips.
The second is water. A shed sees rain on its roof and nothing else. A greenhouse produces water on the inside all year: watering runoff, condensation running down the glazing and off the base rail, and washdown. A greenhouse pad has to drain from the inside out, every month of the year, including the months when the ground around it is frozen.
The third is use. Nobody stands in a shed for two hours. Growers work inside a greenhouse daily, wheel carts across the floor, and set benches on it. The pad is a floor, not just a foundation, so its surface has to stay firm underfoot and drain fast enough to be walked on right after watering.
How a Greenhouse Pad Gets Built
The build starts by stripping. Topsoil, sod, and roots come off the whole footprint plus the working margin, because organic material breaks down and everything above it drops. What is left is subgrade, and the subgrade is the part of the pad nobody sees and everybody pays for later if it was wrong.
Next the subgrade gets proven. That means checking it under load, watching for soft spots that pump or rut, and digging out anything that will not hold. Wet or silty ground gets a geotextile separation fabric so the stone cannot sink into it and the soil cannot pump up into the stone. This one step is the difference between a pad that lasts a decade and one that needs rebuilding in three years.
Then the stone goes in, in layers rather than all at once. Each layer, or lift, gets compacted before the next one is placed, because a compactor only reaches so far down. Stone dumped to full depth and rolled on top is compacted on top and loose underneath, which is exactly where the frame load ends up.
The last stage is the surface. The top of a greenhouse pad is cut to a level a builder can work to, checked across both diagonals, and contained at the perimeter with timber, steel edging, or a shoulder of stone that holds the shape. Only then is it a pad rather than a pile.
Sizing a Greenhouse Pad to the Frame
Start with the base rail dimensions from the manufacturer, not the marketing size of the structure. Kit greenhouses are frequently sold by their nominal footprint while the base frame measures something slightly different, and a pad built to the wrong number leaves the rail hanging over an edge that then crumbles.
From there, extend the stone past the structure on every side. A margin of one to two feet keeps the drip line off soil, prevents a trench forming around the perimeter, gives you dry footing to walk while glazing, and creates a mowing edge that does not eat the pad. The door end usually runs further out to carry carts in and out.
Think about what goes next to the greenhouse before the pad is laid out. Potting benches, a head house, a water tank, hardening off space, and a cart parking spot all want the same firm dry surface, and adding them to the greenhouse pad while machines are already on site is a different job than adding them two years later.
Getting a Greenhouse Pad Level
Level is a stricter requirement here than almost anywhere else in residential site work. A frame assembled on a base that falls away in one corner will not square, and out of square shows up immediately in glazing that will not seat and doors that drag. Getting it flat is cheap while the machine is on it and expensive afterward.
The practical method is to establish a level plane across the whole footprint with a laser or a long straightedge, cut the stone to it, and check the diagonals for square before anything is bolted down. The surface is checked again after final compaction, because compaction moves the surface and the reading that matters is the one taken last.
There is one deliberate exception. The pad as a whole is often set with a very slight fall across it, on the order of a fraction of an inch per foot, so water inside the structure has somewhere to go. The frame still sits on a level plane if the manufacturer requires it, while the surface inside carries a hint of pitch.
Drainage On and Around a Greenhouse Pad
Drainage on a finished pad is a two part problem: water made inside, and water arriving from outside. Inside water is constant and small. Watering overflow and condensation run onto the floor every day of the year, and open graded stone with clean voids drains that away without ever turning into surface mud.
Outside water is occasional and large. Roof shed from the glazing lands in a concentrated line along both long sides, and any ground sloping toward the pad delivers more. Left alone, that combination scours a trench along the base rail and undercuts the pad edge. A shallow stone shoulder, a shaped swale above the pad, or a perimeter drain solves it depending on the site.
If the surrounding ground is already wet, deal with that before the pad rather than after. A greenhouse built in the low spot of a property is a permanent argument with the water table, and the fix is usually broader yard drainage work upslope, not more stone under the structure.
Where the pad has to shed water somewhere, that outlet needs a real destination: a daylight point on a bank, a dry well, or a swale that carries it away. Water routed to a place that cannot take it comes back, and in New England it comes back as ice against the base rail.
Choosing the Stone for a Greenhouse Pad
Most of these pads are built in two layers with different jobs. The base layer is a dense graded crushed gravel with fines in it, because fines are what lock the stone together under compaction and give the pad its strength. This layer does the structural work and is never left as the finished surface.
The surface layer is where growers make choices. Clean angular stone with the fines washed out drains fastest and stays workable in wet weather, but it is loose underfoot and hard on cart wheels. A dense graded surface packs tighter and rolls better, but it holds more water. Many growing operations run clean stone in the aisles and something firmer where carts travel.
Rounded pea stone is the common mistake. It rolls under a boot, will not compact, migrates constantly, and never locks up. Angular crushed stone knits together, which is the mechanical reason the pad holds its shape under traffic.
A woven separation fabric under the stone earns its keep twice over. It keeps the stone and the soil from mixing, and it makes the eventual weed problem far smaller, since the weeds that show up in a gravel floor mostly come from below.
Anchoring a Greenhouse to a Gravel Pad
A greenhouse is the lightest building most properties will ever have, with the largest sail area relative to its weight. Anchoring is not optional, and it is the question a gravel base raises that a slab does not, since there is nothing to bolt into.
The common answers are auger style ground anchors driven through the stone into the subgrade below, a pressure treated timber perimeter frame set into the greenhouse pad and staked or spiked, or manufacturer supplied anchor kits designed for exactly this condition. Which one applies comes from the frame manufacturer, and it is worth reading before the pad is built, because some anchor systems change the pad depth.
Hoop houses and high tunnels are a special case, since their bows are usually driven into ground posts. Those posts have to reach undisturbed soil below the stone, which means the greenhouse pad is built around a post layout rather than the posts being an afterthought on a finished pad.
Greenhouse Pads on Sloped Ground
Very little land in Central Massachusetts is naturally flat, so a greenhouse pad on a slope is the normal case rather than the exception. The ground gets cut into the hill on the uphill side and built up on the downhill side, producing a level bench where the structure sits.
The uphill side needs a way to move water past the bench instead of into it. Cutting into a slope creates a collection point by definition, and a shallow swale or a stone lined channel above the cut is what keeps that collection point from becoming the floor of the greenhouse.
The downhill side needs containment and honest compaction. Fill placed to build up a low corner is the most likely part of any pad to settle, because it is the only part that was not there before. Fill goes in in layers, gets compacted in layers, and gets an edge that holds it, whether that is timber, block, or a stone shoulder graded back to the surrounding ground.
Siting: Sun, Wind, Water, and Access
Where the greenhouse pad goes matters as much as how it is built. Sun exposure is the obvious factor, and the one growers usually get right. The tree line to the south of the site is the one they underestimate, because the shade that is harmless in July is total in November when the sun sits low.
Wind is the factor that is usually missed. An open field position that looks ideal in summer is a wind tunnel in January, and wind load is the force most likely to move a light structure off an under built base. Some shelter, or a plan for the anchoring to handle full exposure, belongs in the siting decision.
Access is the factor that decides whether the job is simple or expensive. Machines need a way in to strip the site and place stone, and stone gets delivered by truck. If a greenhouse pad sits behind a soft lawn or up a steep back yard, a stone access road or a temporary route is part of the job, and it is far cheaper to plan for it than to repair the lawn afterward.
Running Water and Power to a Greenhouse Pad
Almost every greenhouse eventually wants water, and many want power for fans, heat, or lighting. Both are trenched work, and both belong in the ground before the greenhouse pad is built, not after. Cutting a trench through a finished pad undoes the compaction that gives the pad its strength, and the backfilled line becomes the settlement scar that shows up a year later.
Sequencing is simple when it is planned: strip the site, run the utility trenching and any drain lines, backfill and compact those trenches properly, then build the stone base over the top. Water lines need enough cover to sit below frost, and any line that will be shut down for winter needs a way to drain.
This is also the stage where existing buried services get located. A greenhouse in a back yard is often downhill of a septic system, a well line, or a buried electric run to another outbuilding, and finding those with a machine is the expensive way.
A Gravel Greenhouse Pad Compared With a Concrete Slab
Gravel is the default for a reason. It drains, so the water a greenhouse makes every day disappears instead of pooling. It tolerates frost movement, since there is no rigid element to crack. It can be re-leveled and topped up years later with a rake and a few tons of stone rather than demolition. And it is far more forgiving of the imperfect subgrade most back yards actually have.
Concrete makes sense in specific cases: a head house or work room where the floor itself is a hard surface, a propagation area that gets washed down and sanitized, or a commercial operation running heavy rolling benches. Those slabs still sit on the same compacted stone base, so the greenhouse pad work does not disappear, it just gets covered.
The hybrid is common and practical: a concrete or paver work area at the door end where carts and equipment live, and a clean stone floor through the growing space. Both sit on one continuous base built at the same time.
What Goes Wrong When the Greenhouse Pad Is Skipped
The failures follow a predictable order. In the first season the floor turns to mud in the aisles, because stone laid straight onto topsoil has already mixed with it. Weeds come up through the floor at the same time, since there was never a separation layer between soil and stone.
In the first winter the frame moves. Water trapped in an uncompacted base freezes, lifts unevenly, and drops the structure out of square when it thaws. Doors stop latching, vents stop closing, and glazing panels start working loose from their clips. Owners usually blame the kit.
By the second or third year the edges are gone. Without containment the stone has migrated outward, the perimeter has thinned, and the base rail is bearing on soil. At that point the repair is a rebuild, and a rebuild means dismantling a structure that is standing, which is why building the greenhouse pad correctly the first time is the cheapest version of the project.
Maintaining a Greenhouse Pad
A well built greenhouse pad asks for very little. Surface stone spends slowly under traffic, so a top-up of clean stone every few years restores the floor and the drainage at the same time. Traffic patterns tell you where to put it: the aisles and the door approach wear first.
The edges deserve a look each spring. Containment that has been nudged by a mower or a cart is easy to reset early and a real job once the stone behind it has spread. The same walk is a good time to check that the ground around the pad still falls away from it, since landscaping and mulch beds have a habit of building up against an edge and trapping water.
Inside, keeping organic debris off the floor keeps the drainage working. Spilled potting mix, leaf litter, and root material are what eventually clog the voids in a stone floor, which is the one way a good pad slowly stops draining.
How a Greenhouse Pad Fits the Rest of a Growing Property
A greenhouse is rarely the only thing that needs firm ground. Deliveries of soil, stone, and stock arrive by truck. Customers and helpers need somewhere to leave a vehicle. Equipment needs a route that does not cross a lawn.
On working properties, the greenhouse pad usually gets built alongside a gravel parking area and a connecting route, because the machine, the crew, and the stone are already on site and the incremental cost of doing it in one visit is small. The same is true of a tired gravel driveway installation at the front of the property.
Thinking about the whole layout once also prevents the most common planning mistake, which is putting the greenhouse exactly where the only sensible route to the back of the property runs.
In Massachusetts, Watch Out for These
Call before the first bucket of soil comes off. Massachusetts law defines excavation broadly. Under MGL Chapter 82 Section 40, excavation includes movement or removal of earth or rock, digging, augering, backfilling, grading, and trenching, so stripping and grading a greenhouse pad is excavation in the statutory sense. Notice goes through Dig Safe by dialing 811 or filing online, and the state explains the process on its Dig Safe page and in its guide to Dig Safe.
Plan around the 72 business hour notice period. That is business hours, excluding weekends and holidays, so a Thursday call does not clear a Saturday start. It is the single most common scheduling surprise on small site work.
Respect the frost line. Frost commonly reaches about 48 inches in Massachusetts, which is why footings for heated structures go that deep. A gravel greenhouse pad does not chase frost with depth. It works with frost by removing the water that makes frost destructive, which is a completely different strategy and only works if the drainage is real.
Check wetlands before siting the structure. The Wetlands Protection Act, MGL Chapter 131 Section 40, requires written notice to the local conservation commission before anyone removes, fills, dredges, or alters a wetland resource area, and jurisdiction generally reaches 100 feet out from a bordering vegetated wetland. The state summarizes it on its page for protecting wetlands in Massachusetts. Greenhouse pad work inside that buffer is a filing, not a judgment call.
Ask the town about permits and setbacks before the stone is ordered. Under MGL Chapter 143 Section 3, every city and town employs a building commissioner or inspector of buildings who administers and enforces the state building code locally, so the permit answer for a greenhouse comes from that office. Zoning setbacks are a separate local rule and are the one most often discovered after a structure is already standing.
Know that agricultural use has zoning protection, and know its limits. Under MGL Chapter 40A Section 3, zoning may not prohibit, unreasonably regulate, or require a special permit for land used for the primary purpose of commercial agriculture or horticulture, or for structures built for that primary purpose, and towns may limit that protection to parcels of five acres or more, or to smaller parcels meeting a sales threshold. The same section states plainly that zoning cannot exempt land or structures from wetlands or flood plain rules. A backyard hobby greenhouse is not covered at all.
Watch the septic system. A greenhouse placed over a leach field or its reserve area is a problem that surfaces at the worst possible moment, usually during a title inspection or a system failure. The as built plan is on file with the local board of health, and checking it costs one phone call.
Frequently Asked Questions About Greenhouse Pads
How thick should a greenhouse pad be?
Four to six inches of compacted crushed stone over a proven subgrade covers most backyard and small commercial greenhouses on firm ground. Soft, wet, or filled ground calls for more depth and usually a separation fabric underneath. The honest answer comes from what the ground turns out to be once the topsoil is off, which is why a greenhouse pad starts with digging rather than with a number.
How much bigger than the greenhouse should the pad be?
Extend the stone about one to two feet past the frame on every side. That margin puts the glazing drip line on stone instead of soil, stops a trench forming along the base rail, and gives you dry footing while you glaze and work. The door end normally runs further out so carts have somewhere firm to land.
Do I need a permit for a greenhouse in Central Massachusetts?
It depends on the size of the structure and on your town. The state building code is administered locally by your building commissioner or inspector of buildings, and zoning setbacks are a separate local rule. One call to the building department in Grafton, Worcester, Shrewsbury, or Northborough answers both before anything is ordered. Land in genuine commercial agricultural use has additional zoning protection under state law.
Is gravel or concrete better under a greenhouse?
Gravel is better for most growing structures because it drains the water a greenhouse produces daily, tolerates frost movement, and can be re-leveled years later. Concrete makes sense for a head house, a wash down propagation area, or heavy rolling benches. Either way the base underneath is the same compacted stone, so the pad work happens regardless.
When is the best time of year to build a greenhouse pad in Massachusetts?
Late summer and early fall are ideal in Central Massachusetts, because the soil is dry, compaction is straightforward, and lawns recover from equipment. Early spring is the hardest window, since thawing ground will not compact properly. The season closes once frost is in the ground, because a greenhouse pad built on frozen subgrade settles as soon as it thaws.
Getting a Greenhouse Pad Built on Your Property
A greenhouse pad is a small project with a long tail. Built correctly, nobody thinks about it again, the frame stays square, and the floor drains for years. Built on hope, it shows up as a binding door in the first winter and a dismantled structure in the third, and the greenhouse itself usually takes the blame for something the ground did.
D&M Good Construction builds greenhouse pads across Grafton, Worcester, Shrewsbury, Northborough, and the surrounding Central Massachusetts towns as part of our gravel installation and driveways work. We look at the spot, the soil, the water, and the access before quoting anything, because those four things decide the job.
If you have a greenhouse on order, or one already standing on ground that gave up, tell us what you are working with and we will walk the site with you. Our estimates are always free.